Affichage des articles dont le libellé est tutoriel. Afficher tous les articles

lundi 12 novembre 2012

Yo-yos de Noël - Christmas yo-yos


Voici une autre idée pour l'utilisation des yo-yos chez vous pour Noël!
Here's another idea for using yo-yos in your home this Christmas! 

L'année dernière, au mois de décembre, j'ai écrit un tutoriel qui montre comment utiliser le faiseur de yo-yo de Clover. Puis j'ai fait  des arbres de Noël.
Last year in December I wrote a tutorial showing how to use a Clover yo-yo maker. Then I made yo-yo Christmas trees.


Cette année, j'ai un projet pour accueillir vos invités de Noël. J'ai utilisé le 60mm faiseur de yo-yo et tissus de Noël comme avant. (Vous pouvez utiliser une plus grande taille et moins de yo-yos ... votre projet grandira plus rapidement!)
This year I have a project to welcome your Christmas guests. I used the 2⅜ inches yo-yo maker and Christmas fabrics as before. (You could use a bigger size and fewer yo-yos ... your project would grow more quickly!) 


J'avais besoin de 315 yo-yos. Ils ont été cousus dans des chaînes de 7 yo-yos. J'ai utilisé les minuscules points en zigzag sur la machine.
I needed 315 yo-yos. They were stitched into strings that were 7 yo-yos long. I used tiny zigzag machine stitches.


Ensuite, j'ai formé les chaînes dans un "tapis" ...
Then I formed the strings into a mat ...


J'ai continué en ajoutant des rangées jusqu'à ce qu'il était de 2.40 mètres de long! Pour décorer un lit de 1,5 m! Vous pouvez adapter la taille pour un lit d'une personne.
I continued to add more rows until it was 8 feet long in order to decorate a 5 foot bed! The size can be adapted to fit a single bed!


jeudi 5 juillet 2012

Clover Kanzashi Flower Maker tutoriel - tutorial


Le confectionneur de fleurs Kanzashi de Clover est disponible en deux tailles - petite et grande. La petite taille fait une fleur de 50mm de diamètre et la grande de 75 mm de diamètre. C'est rapide et facile à utiliser.
The Kanzashi Flower Maker from Clover is available in two sizes - small and large. The small makes a flower 2 inches in diameter and the large 3 inches in diameter. It is quick and easy to use. 

Placez l'outil sur l'endroit du tissu. Puis pliez l'outil en deux entourant le tissu.
Place the tool on the right side of the fabric. Then fold the tool in half enclosing the fabric.


Coupez les bords du tissu.
Trim the edges of the fabric.


Faites un noeud au bout d'une longueur de fil (70cm).
Make a knot at the end of a 27 inch length of thread.


Insérez l'aiguille du dos vers le devant ( le trou 1)...
Insert the needle from the back to the front at hole 1...


Insérez l'aiguille à nouveau au trou numéro 2. Puis continuez à suivre les chiffres et finir au trou numéro 12.
Insert the needle again at hole 2. Then continue to follow the numbers finishing with hole 12.


Enlevez l'outil ...
Remove the tool ...


Pliez le tissu en deux et tirez le fil doucement ...
Fold the fabric in half and pull the thread gently ... 


Gardez le premier pétale à gauche et répétez - pas à pas. J'ai fait cinq pétales.
Keep the first petal to your left and repeat the process. I made five petals.


Tirez le fil à travers le premier pétale une fois de plus. Tirez fermement et faites un noeud.
Pull the thread through the first petal one more time. Pull tight and form a knot.


J'ai fait une autre fleur avec la petite taille dans un tissu coordonné.
I made another flower in the small size using a coordinating fabric.


Je les ai arrangés et ajouté un bouton ...
I arranged them like this and added a button... 


C'est prête pour une broche... pour décorer un sac à main ... pour faire une guirlande ... pour orner vos cheveux?
It's ready for a brooch ... for decorating a handbag ... for making a garland ... for adorning your hair?


vendredi 30 décembre 2011

Tutoriel - un journal plus joli ... Tutorial - a prettier diary ...


C'est bientôt 2012 - le temps de commencer un nouveau journal. J'ai acheté le mien il y a quelques mois chez Lidl. Je l'aime parce qu'il y a une page par jour, mais ce n'est pas très joli! J'ai décidé de l'égayer un peu ...
It is nearly  2012 - the time to start a new diary. I bought mine a couple of months ago at Lidl. I like it because it has a page a day but it is not very pretty! I decided to brighten it up a bit...

J'ai choisi d'utiliser quelques morceaux de "Rural Jardin" tissu de moda (French General). J'adore cette gamme!
I chose to use some scraps of "Rural Jardin" fabric from moda (French General). I love this range!


J'ai mesuré le journal et j'ai fait un modèle de papier en ajoutant un demi-pouce (12mm) à tous les côtés ...
I measured the diary and  made a paper pattern adding an extra half an inch to all sides ...


Pour décorer la couverture du journal j'ai coupé des carrés 1½ x 1½ pouces (3,8cm x 3,8cm) et deux bandes x 1 pouces... (24cm x 2,5cm)
To decorate the front cover of the diary I cut squares 1½" x 1½" and two strips 9½" x 1" ...


J'ai cousu les carrés comme illustré et j'ai repassé les coutures ouvertes. J'ai utilisé une couture de ¼ pouce (6mm) ...
I stitched the squares together with a ¼" seam as shown and pressed the seams open...


J'ai cousu une bande à chaque côté comme illustré et j'ai repassé les coutures vers les bandes ...
I stitched a strip to each side as shown and pressed the seams towards the strips ...


J'ai coupé deux morceaux de tissu principal en utilisant le modèle du papier ...
I cut two pieces of the main fabric using the paper pattern ...


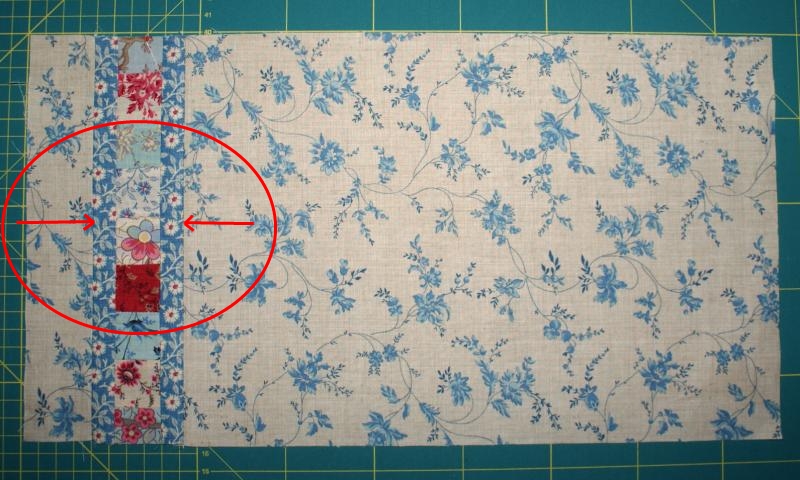
J'ai coupé une bande de 1¾ pouces (4,5cm) de large d'un côté du tissu principal et je l'ai cousu à la bande décorative ...
I cut a strip 1¾" wide from one side of the main fabric and stitched it to the decorative strip ... 


J'ai cousu la bande décorative au tissu principal (maintenant plus petit) et j'ai repassé les coutures comme illustré ...
I stitched the decorative strip to the remaining (now smaller) piece of the main fabric and pressed the seams in the direction shown ...


J'ai utilisé le modèle en papier pour rogner le tissu à la dimension correcte une fois de plus ...
I used the paper pattern to trim the fabric and return it to the correct size ...


J'ai coupé deux morceaux de tissu 9⅝ x 8½ (24cm x 21,5cm) pour les rabats.  J'ai plié chacun en deux dos à dos et je les ai placé comme indiqué ...
I cut another two pieces of fabric (9⅝" x 8½") for the side pockets. I folded each one in half with wrong sides together and placed them as shown ...


 J'ai ajouté l'autre morceau du tissu principal comme illustré ...
 I added the other piece of the main fabric as shown ... 


J'ai placé épingles sur les bords et j'ai cousu - J'ai retiré les épingles comme j'avançais. J'ai laissé une ouverture pour tourner la couverture intérieur vers l'extérieur ...
I pinned the edges and stitched removing the pins as I went along. I left an opening for turning the cover inside out ..


J'ai rogné les coins et j'ai tourné la couverture intérieur vers l'extérieur . J'ai poussé les coins soigneusement, et j'ai repassé la couverture et j'ai cousu la petite ouverture à la main ...
I trimmed the corners and turned the cover inside out. I pushed out the corners carefully, pressed the cover well and stitched the opening closed by hand...


J'étais prête à ajouter la couverture pour mon journal ...
I was now ready to add the cover for my diary ...


Mettre la dernière main, j'ai ajouté des perles et une breloque sur le ruban à marque-page ... Merci à mon amie écossaise pour la breloque! C'est possible de trouver beaucoup de breloques sur le thème "loisirs créatifs" à sa boutique en ligne ici
To add a finishing touch I added beads and a charm to the ribbon bookmark ... Thank you to my Scottish friend for the charm! It's possible to find many charms on the theme of  crafts and hobbies at her online shop here 


Related Posts Plugin for WordPress, Blogger...